For my level creation project I’ve decided to make a tutorial on how to make the basics for a 2D game in unreal4. Since I wanted to focus on how to input my own characters and items, and the interactions inside unreal more so than the actual items themselves I have used content from unreal for my tutorial.
First because I want to show how to input your own characters and all your own materials. You need to start with a Blank Project. You can include starter content if you want but we don’t use it in this tutorial so it’s totally optional. Either way in your new project, press file, new level, empty level then save it as whatever you want.
Inside the content browser make a new folder called Textures. Then import the files provided to you from unreal given in a link below. Or ones you have created yourself if you want to make your own character/environment.
https://wiki.unrealengine.com/File:Paper2DTextures.zip
Material Editor
Create a new folder called Materials, then make a material called Level Prototype. Open Material Editor and change the shading model to unlit. Unless of course you are going to use lighting in your scene then change it accordingly. Right click again and type World Position and select the top choice, the node should appear saying Absolute World Position.drag out from absolute world position and make a mask. Because we’re making a 2d game we only want to move in the x and z axis, because the mask is based on colour this refers to R G and B. So we want R and B ticked but not G or A.
Hold down 1 and left click, which will create a integer. Then right click and convert it to a parameter. Change the name to repeats per meter and the value to 1. Create a divide node and connect the Repeats per meter to A. Then hold down 1 and left click again and change the value to 100. This is because unreal works in centimetres so 100 is a metre. Create a multiply node from the mask we made earlier. So mask is connected to the A in multiply and divide to connected to the B. Right click and type parameter, after that select the textureSampleParameter2D. It’s important to change the name to SpriteTexture as it will be used later on. Right click again and create Vertex Color. Drag out from SpriteTexture and create a Multiply node and connect the Vertexcolor to B. Then input the Multiple to the Emissive Color in LevelProtoype.
If you want some opacity then change the Blend mode in LevelPrototype to Translucent. Which should change opacity on LevelPrototype from grey to white. Then drag the bottom circle on Vertex Color into Opacity.
Using the files provided The 2D BackgroundTile is what you can use but it’s just plain matt grey so the repeateable textures won’t be noticable, so this is when you could input your own background or use the PrototypeTexture to see the repeats in action. To use the texture you have to select SpriteTexture and then drag the texture you want to use into the texture box from you content browser.
This is what is should look like at the moment.

If it is then save and close the material editor
Sprites
Back in the content browser at the bottom when it says View Options, click show plugin content which will create the Paper 2d Content. Create a new folder in the content browser called Sprites. Then in the texture folder select the 2d Background yours or the one given to you then right click and create sprite. You can change the name if you want but it’s not really necessary since the name given is pretty good. Drag the newly created sprite into the sprite folder then choose move here.
In the viewport change the perspective at the top to front. Then drag the 2dBackground_Sprite into the level, it should still be in wireframe so no image will show. To change this on the right of the perspective box is one the says wireframe you want to change that to to lit. There should be a red horizontal line in the viewport this is known as the killzone, so make sure the Background is just sitting on this line as show below.

Go back into the texture folder and create a sprite based on the Prototype texture we used earlier for the material or whatever repeatable texture you used. Then move it into sprites like we just did with the background. Now this is where it’s a bit different, you need to double click the sprite for Prototype and then a new window called the sprite editor should pop up. On the right is a box called details, change the default Material on the top right to the material we made earlier called Level Prototype. Then save and close.
Now the scale and locations of each sprite need to change, for the platform I made it :-

The main important thing for the location of the platform is that is on the same position as the player, in this case I have decided to put everything interactive on 0. This is important as there is no y axis in the 2d game and so anything outside this axis will not be interactive with the player.
The scale and locations for the background is:-

Considering that the y location is important for interactions it’s necessary that the background isn’t touched and so the y axis is -200 but anything minus would be fine.
Other than those you can really change the scale and location however you want that’s just what I’ve chosen. Going back to the top left corner go to basic and drag in a player start, place it wherever you want but considering the player wants to interact with the platform change the y axis to 0.
Also a cool thing you can do is change the colour overall of the sprite. To do this select the platform and then go to the right and change the sprite color. I do this in my final level.
Next while the sprite folder is open, right click the background and go down to miscellaneous than click sprite. Name it Platform and double click it opening the sprite editor. On the right find source texture and change it to 2D BackgroundBlockAtlas. After that click Edit source region on the top right, this will change the viewport creating a white box around the sprite. You need to drag the corners of the box to fit the platform as shown below. So now when you click back to view in the buttons above you only see the platform we want.
![]()
Now view and Edit Source Region have both been explored you want to click Edit Collision which will show you how the character will interact with the sprite shown. On the right there is a box titled collision geometry to the Tight Bounding box. Then on the yellow box surrounding the sprite, shift click on the yellow line and you will create a vertex. Different types of vertex manipulation is shown on the top left of the screen. You want to create a box like the one shown below.
![]()
Finally the last box to click on is Edit RenderGeom, so go ahead and click it. This is used to hide the visibility to the player. This is used to get rid of artefacts found in the alpha channel and since an artefact is showing on the platform you want to create a box similar to how you did in Edit Source Region. To look like this.
![]()
Now you can save and close the sprite editor.
With all that sorted you can drag the platform sprite into the level from the content browser. Once you drag it in, you can scale and move the location however you want, as said before since it is interacting with the character it needs to be at the same y axis in this case 0. But every other option is up to you.
Depending on if you want the platform to stay static or move you can change the physics affecting it in the sprite editor. On the right there is a Physics menu, if you tick stimulate physics then the platform will fall when you start a simulation but if you want it to fall onto the ground more realistically you need to lock it’s y axis, which you do in the same menu.

Flipbooks
Open the textures folder in the content browser and right click the 2dCharacter_IdleAnimAtlas then choose ExtractSprite. This will automatically create 8 different sprites based on the alpha channel . Then while they are still selected move them into the sprites folder.
Double click on any of the sprites you just created and in a new window at the bottom right will be the sprite list that shows all the sprites from that one texture. The way unreal imports them is very clever and does it order but goes backwards for the second line for some reason. So you need to rename them so it’s correct . In this case change 5 to 8, 6 to 7, 7 to 6 and 8 to 5. Overall I changed the sprite name to Idle_# to make it easier to read. Save and close he sprite editor.
After doing this you want to go back to the texture folder and extract the run. The run is different because of its alpha channel being more precise. It doesn’t extract them all separately so we have to do it manually. Move the sprite into the sprite folder and rename it as Run_X, right click it and duplicate it until you have 16. Now the really tedious part is renaming them at 1-16. To make renaming them quicker you can press F2 to rename .
Select all 16 and right click to go to property matrix. Click on the arrow next to the sprite and again next to source Dimension. Select all of the Run_# in the list and change both X and Y to 256.

Now that the source area is the correct size we now need to it be in the right place. This is done above Source Dimensions in Source UV. First we want to do the Y axis since it’s easier. 1-4 is at 0 so it’s already correct, 5-8 is at 256, 9-12 is at 512 and 13-16 is at 768. Next the Y axis for 1, 5, 9 and 13 is already correct at 0. 2, 6, 10 and 14 needs to be at 256. 3, 7, 11, 15 needs to be at 512. Lastly 4, 8, 12 and 16 need to be at 768.
If you open up sprite editor now for run you should have a full run cycle in the editor.
Go back to the content browser and create a new folder called flipbook. Inside there right click and go down to animation then create sprite flipbook. Call the newly created flipbook Idle_Flipbook. At the top right there is a little box called Sprite and in key frames is a little plus box you want to make as many boxes as there is frames so in this case we need 8 boxes. The Flipbook editor needs to be a window so the content browser is still visable on the main screen. Go into sprites and drag Idle_1 into Frame 0 and Idle_2 into frame 1 etc.etc. Until all frames are in creating a idle animation. Considering how fast it is you can change the frames per second , I changed mine to 10.
Now we need to do that all over again expect this time for the run, which means we need 16 frames. Then Save everything.
Setup of the Character
Make a new folder called Blueprints, right click in there and make a new blueprint then instead of clicking any of the common classes go to All classes and type character and select PaperCharacter. Then name it MyCharacter, double click it and look at it in component view. In the component box at the top left click onto the sprite component. Then in the sprite dropdown menu in details, click the source flipbook and place IdleFlipbook in there.
Now to make the character fit better into the capsule, go back to the content browser and select all idle and run sprites and open property matrix again. On the right there is a drop down menu called Pixel per unit change that to 1.28 and then he should fit into the capsule better.

Go back to the MyCharacter Blueprint and go to Components , then select CharacterMovement in the components list. Entirely optional you can set these however you want but this is just a default list given by unreal. First go to the eye in the top right and tick show advanced options then change, Jump z velocity to 1000, gravity scale to 2, ground friction to 3, air control to 0.8, use flat base ticked, then search plane and set constrain to plane true.
Creating a camera
Click Add components and search spring arm and select it. Change the name of the spring arm to CameraBoom. Turn off Do Collision Test and Inherit Yaw. Then change the z in Rotation to -90.
Add another component, this time add a camera and name it CharacterCam. Then drag the CharacterCam into the CameraBoom. Turn off use pawn control rotation. Projection mode needs to be set to orthographic, then change the ortho width to 1600 but feel free to change it later. Then go up to the rotation and change the Z axis to 0 because it’s parented to the Camera Boom. Feel free to move the camera back but that is actually controlled by the Ortho Width and really makes no difference.
Testing the Character
Make a new blueprint in the blueprint folder and click game mode, call it PaperGameMode . Open it up, then go to defaults then change Default Pawn Class to MyCharacter, compile, save and close. In the main screen go to Edit, Project Settings, Project, Maps and Modes. In there change both Game Default Map and Editor Startup Map to your level, in this case My2DMap. Change Default GameMode to PaperGameMode, click the arrow below and change the Global default to PaperGameMode too.
Press play not simulate and if the character appears, you shouldn’t be able to control it yet, then everything is going according to plan.
Movement of the Character
Go back to Project settings, then Engine, Input. In axis mapping add a new ones called MoveRight. Then in that add three new ones, GamepadLeft X , D and A. A should be -1 on the scale as shown below. Then add one to the Action Mappings called Jump. Make 4 additions Gamepad Face Button Bottom, Space bar, W and Touch 1. Touch 1 only being for mobile devices.

Open up MyCharacter Blueprints, then in graph right click and type Event Begin Play. Untick context sensitive and drag out a Set Is Replicated node. Tick Show inherited variables in the top left box and a bunch of options will show themselves. Drag Sprite out from under character into the blueprint and then select GET. Dragging that into the Target for Set Is Replicated.

Right Click in blueprints and tick Content Sensitive on. Then type move right, until Input Axis Move right comes up. Then type Add Movement Input and connect the white arrows on both of the nodes then put the axis value into the Scale Value. Drag out again from the axis value and get a CompareFloat, type 0 into Compare With. Right click and type Get Controller, drag out from the return value and type Set Control Rotation. Then drag from the top arrow of Compare float into the Set Control Rotation. Drag out from the new rotation on Set ControlRotation and make a MakeRot node. Copy and paste the three nodes. Set Control Rotation, Get Controller and Make Rot. Then connect the new Set Control Rotation to the bottom arrow on Compare Float. In the new Make Rot, change the Yaw to 180. This is all so the character sprite turns around when walking in the opposite direction. Then connect the Exec of Compare Float into Add Movement Inputs Arrow.

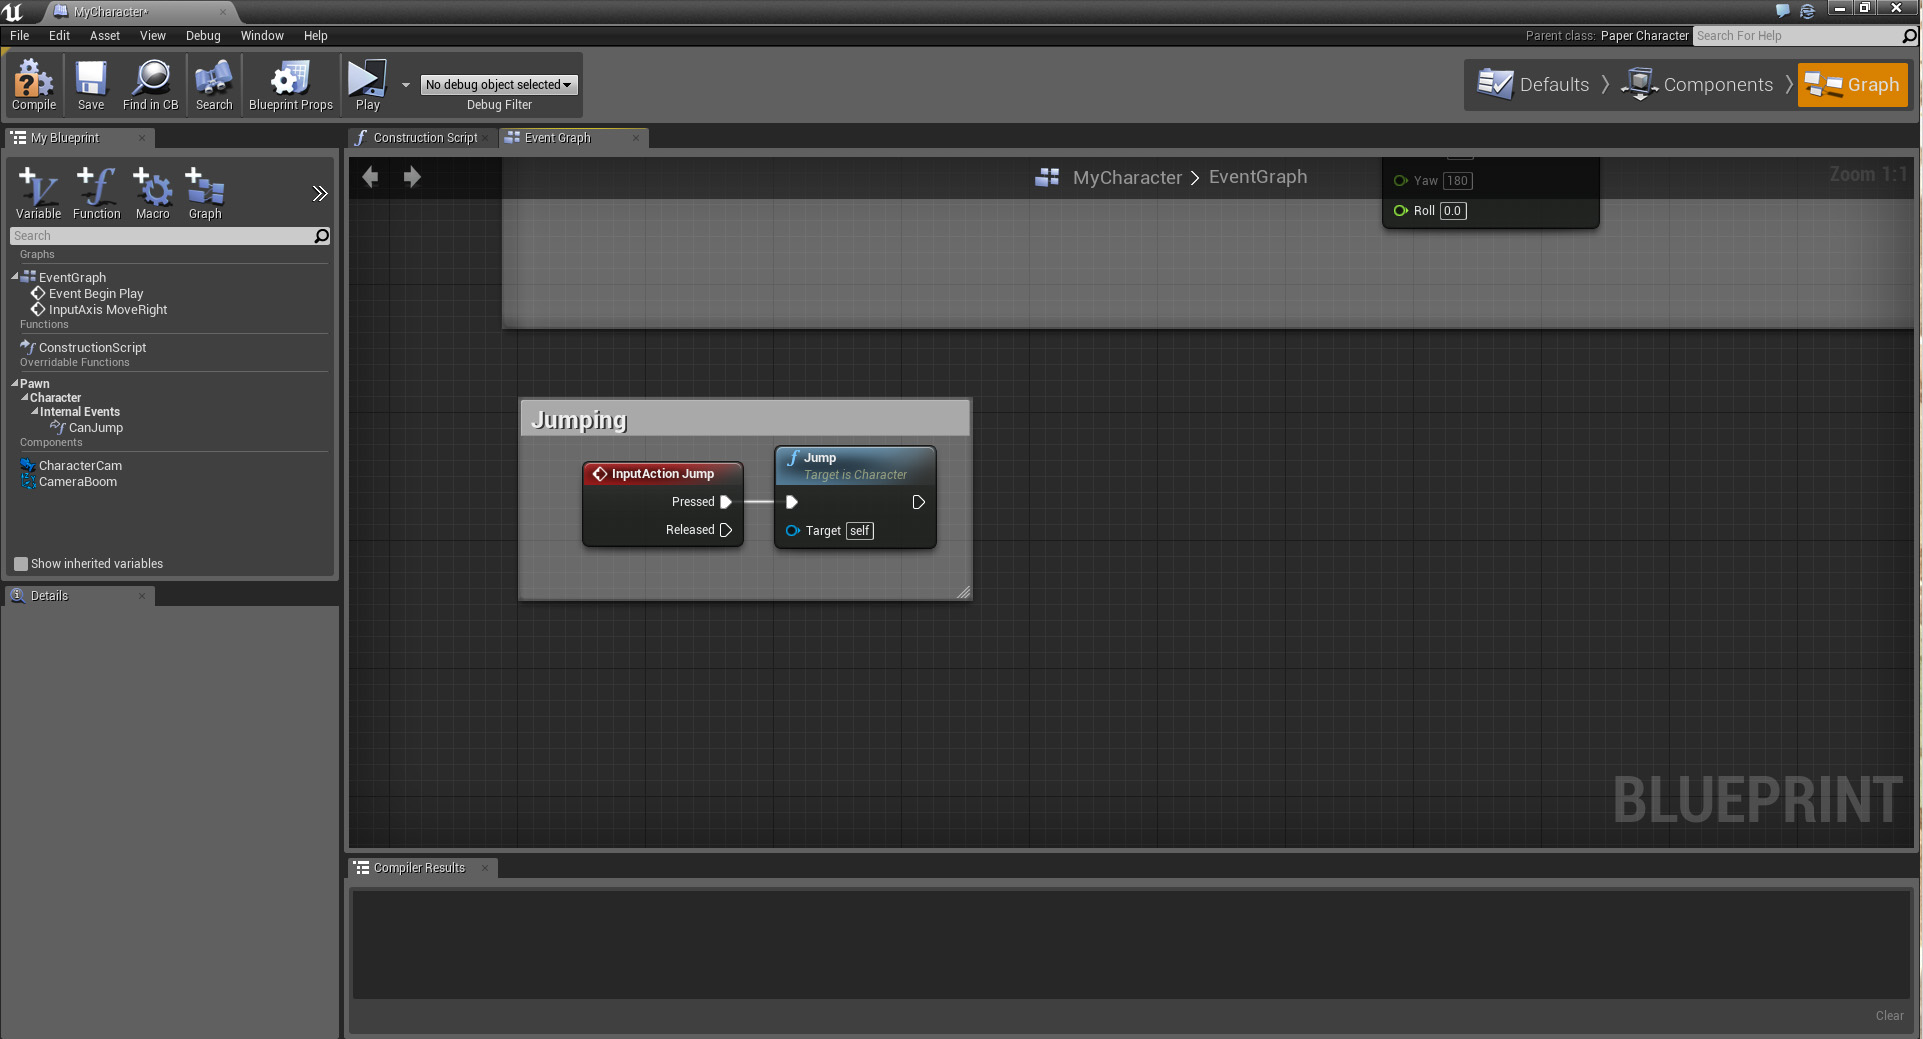
Next right click and create an Input Action Jump then drag out from pressed and create a Jump Node. This is all you need for Jumping for now we’ll make it a bit more detailed later.
Animation of the Character
Right Click in the Blueprints and create CustomEvent and call it UpdateAnimation. Rightclick again and type Get Velocity. Drag out the return value and type vector length. Then drag out the new return value and get a Float > Float Node, you can get this by just typing >. Next right click and write Select to get the select node. Drag the > node into the Index in Select and it’ll automatically turn into a boolean. To change this right click it and change it ‘s pin type. Then a little dropdown menu will appear . CLick it then type Flipbook and select PaperFlipbook.
Option 0 is false and 1 is true, So 0 wants to be the Idle flipbook and 1 wants to be the Run Flipbook. In my blueprint on the left check Show inherited variables then drag sprite into the scene with Get. Drag out from that and type Set Flipbook. Drag updateAnimation into the arrow on Set Flipbook and Selects Return Value into New Flipbook on Set Flipbook.
Go back to the Movement one we made before and drag out from Add Movement Input and create a Update Animation node. Overall it should look something like this.

Then compile and save.
More detailed Animation
Back to jumping, go to textures and make a sprite from the Character Jumping. Then make a flipbook for it just like you did earlier with the other two, even though it is just one frame. Then go back to the My Characters Blueprint.
In there tick Show inherited variables on the left and drag in a Character Movement node by Get. Then drag out and create a Is Falling, I found I could only get this by unticking context sensitive. Then delete the select we made earlier and disconnect the Update animation. You can do this by Alt- clicking the connection. So it should look like this now.

Right click on the red button on the > node and promote it to a variable. Then write IsMoving straight away, so the name changes. Then connect the arrow from UpdateAnimation to the IsMoving Node. Then promote the red button on Is falling’s return value to a variable and call that IsFalling.

Create a new function and call it Animation StateMachine . Add two boolean inputs and call one IsFalling and the other IsMoving. Then create a flipbook output and call it OutputFlipbook.

Add a variable call it IdleFlipbook and then change the variable type to Paper Flipbook, in category write animations to create a new category. Make another two variables called RunFlipbook and JumpFlipbook, and set their categories to animation too. Now in each Variable in Default Value you can set the appropriate Flipbook to the Value. If you can’t select them try compiling and saving then try again.
Create a new folder in the content browser and call it data. Inside data right click to blueprints, enumeration and call it AnimationState. Double click it and click new in the new window, call that Idle and do it again twice, another called Running and another called Falling or Jump. Save, then go back to blueprints and create a local Variable called AnimationState and change it’s variable type to AnimationState, then drag it into the blueprints and select Get. Create a select node by right clicking then drag the Animationstate into the index and it will update the inputs of what we created. From the animation category we made earlier we can input the IdleFlipbook, RunFlipbook and Jump Flipbook. Then input the Return value in select into the Output Flipbook in the ReturnNode. So it should look like this.

Make another 2 LocalVariables and call them IsFallingLocal and IsMovingLocal and change the variable type to boolean. Drag them into the scene and select set this time (or alt drag). Then drag out from the arrow on NewFunction0 into the SET IsFallingLocal and then from that arrow into IsMovingLocal. Then connect the red buttons so falling is connected to falling and moving is conncted to moving.

Drag out from the Set IsMovingLocal and create a Branch node. Then right click and make a IsFallingLocal Get and drag that into the condition button on Branch. Drag Animation state from the Local Variables connect the true arrow from Branch into it. On the dropdown menu you should change it from idle to falling. Copy and paste this 2 times so we have 3 overall, change the other to running and the other to Idle. From the branch earlier drag out another branch from the false arrow . From here you can connect running to the true arrow and Idle to the false arrow. Then create a isMoving local and drag that into the condition button on the second branch. After all of this is created drag out from any of the sets and create a reroute and drag the other two set arrows into this too. From there drag the reroute into the return node from earlier. As shown below.

Compile and save.
At the tabs at the top of screen select EventGraph and drag in AnimationStateMachine into the graph. Connecting it to the SET isFalling arrow. Drag in a get IsFalling and get IsMoving, then connect them to the buttons to animation StateMachine. Then drag the arrow coming out into Set Flipbooks incoming arrow and the Output Flipbook into the New Flipbook. So it should now look like this.

Compile and save then play the game to make sure it works.
With all of that done, you now have the basics of how to create a 2D game down. You can input your own characters and give them different animations by using blueprints. Here’s a final look of my overall finished blueprints and my level. I changed the background on mine later as I wanted to try out different pictures to see if it differed from the file provided by unreal.


vimeolink.